Tabular Warehouse Overview
The tabular warehouse overview shows the contents of the complete cellar in the form of a chart.
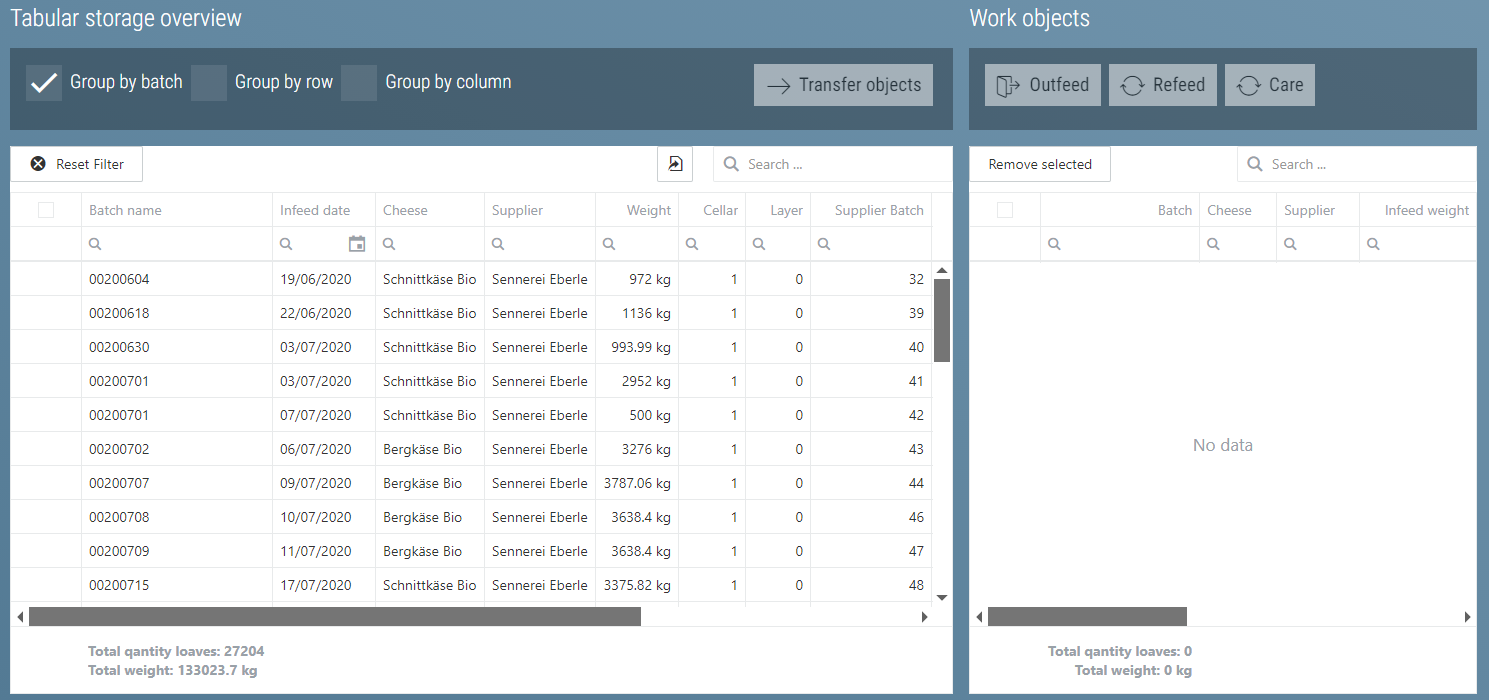
Normally the cheeses are grouped by batch. This means there is one entry for each batch.

In addition, it is also possible to group the batches by rows and by column. This makes it easy to see in which row or column the cheese is located.
Row, column and level are only filled in if there is a grouped entry in just one row, column or level. If this is not the case, the column reads 0.
To list the cheeses of the individual tiers you have to remove the check mark at 'Group by batch'. Then the whole inventory is listed tier by tier.
Tip
To view a cheese in the row display, you can click the right mouse button and then select "Go to Warehouse".
Performing Actions
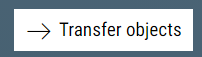
Various actions regarding the cheeses can be initiaded from this view. To do this, the required list entries must first be selected. Then you can use 'Transfer Objects'
 or, if it is only one entry, make the selected entries into work objects by double clicking or right clicking.
If you have selected Transfer Objects, a popup will appear, with which you can set the desired amount of cheeses.
After clicking Confirm  you get the desired amount of cheese of the selected entry as work object.
These appear in the right table.
you get the desired amount of cheese of the selected entry as work object.
These appear in the right table.
You can then retrieve these work objects from storage, transfer them or have them treated.
To do this, you have to click on the desired work object and select the action you want to perform:

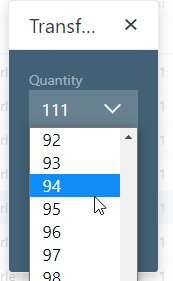
Retrieval From Storage
When you click on Retrieval from Storage, the Retrieve From Storage popup appears. This popup allows for various settings:
The following settings can be made:
| Name | Description |
|---|---|
| Pick-Up Date | This date is used to enter the retrieval from storage in the books. This means it is possible to prepare a retrieval from storage earlier in the system and still keep the accounting correct. |
| Customer | The recipient of the cheese. This is necessary for traceability and accounting |
| Carrier | Whoever is transporting the cheese. Necessary for traceability and accounting |
| Number of cheeses per pallet | This number is prefilled using the cheese master data. It determines how many pallets a retrieval is divided into. This is necessary if you want to weigh the pallets. If no weighing is done during retrieval, the total number of cheeses can be entered here. |
| Number of stacks per pallet (optional) | This number is prefilled using the cheese master data. It is only necessary for robots that retrieve the cheese directly onto pallets. In most cases this only concerns large cheeses over 30 kg. Here it determines how many stacks the robot makes on the pallet |
| Cheese type (optional) | When the cheese is retrieved from storage, there is the possibility of retrieving it as a different type of cheese. This means that it will be listed as a different type of cheese on retrieval slips and invoices etc. |
| Order number (optional) | An order number can be entered here. This can be used in the search for retrieved batches |
| Plasticizing (optional) | Whether to plasticize. Serves as instruction for employees and is printed on the retrieval note. |
| Shrinking (optional) | Whether to shrink. Serves as instruction for employees and is printed on the retrieval note. |
| Fleece (optional) | Whether to fleece. Serves as instruction for employees and is printed on the retrieval note. |
If you click on Confirm, the pallets appear in the Retrieval view.
Transfer
When you click on Transfer, the Transfer popup appears
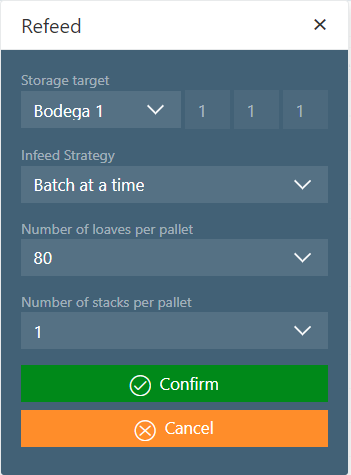
The following entries must be made here:
| Name | Description |
|---|---|
| Transfer Destination | The transfer destination determines where the cheese is to be relocated to |
| Transfer Strategy | Which strategy should be used to determine the new positions |
| Number of cheeses per pallet | How many cheeses should be placed on a pallet. This has a logistical significance here. If it does not matter how the cheeses are handled during transfer, the maximum number of cheeses can always be entered here. |
If you click on Confirm, the pallets appear in the Transfer view.
Treatment
Clicking on Treatment displays the Treatment Popup
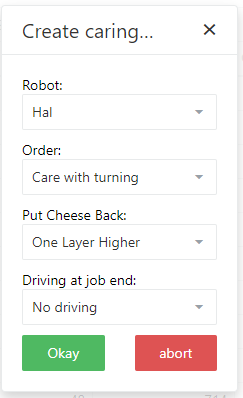
The settings here are the same as those in the Robot Jobs. Only does the position information not have to be entered, because it is already evident which cheeses have to be treated.