Warehouse Movements
The warehouse movements include all functions with which cheese is brought into and out of the warehouse.
Prepare Batches
This is where batches are prepared for storage. This requires various information to be entered.
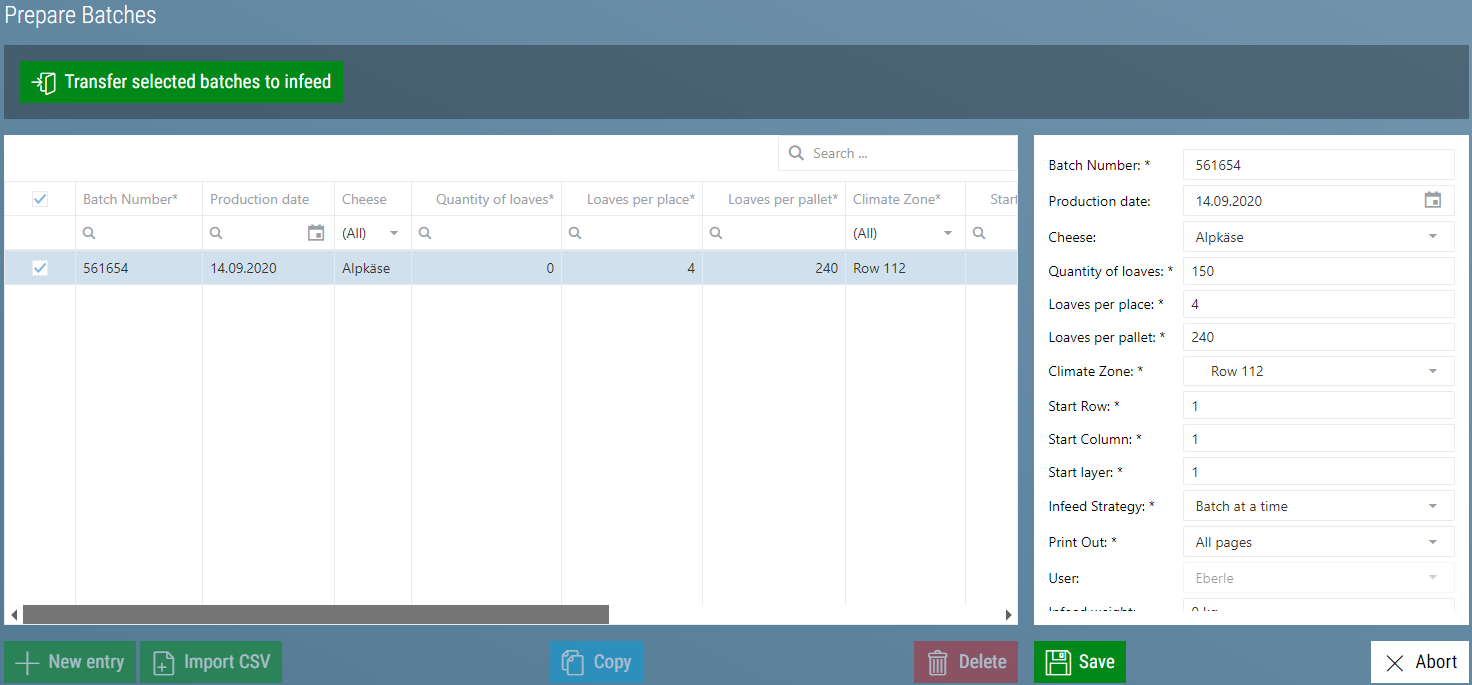
Depending on configuration, the following parameters can be entered:
| Name | Description |
|---|---|
| Batch Number (optional) | The batch number or batch name. This number is displayed throughout the process. Should be unmistakable. Only visible if the internal batch number is not used. |
| Batch (optional) | Optional additional text. In the tabular storage overview, you can filter according to this. |
| Date of Delivery | The date when the batch was delivered to the cheese warehouse. Depending on the settings, this date can be used for age calculation. |
| Production Date | The date when the batch was produced. Depending on the settings, this date can be used for age calculation. |
| Load (optional) | Designation of the load. In the tabular warehouse overview, you can filter according to this. |
| Supplier | Who delivered the batch. |
| Hygiene Number (optional) | The hygiene number of the batch or production facility. Often included or imprinted. Is set automatically when the supplier is selected from their master data. |
| Manufacturer (optional) | The manufacturing company. Can be imprinted as well. Is set automatically when the supplier is selected from their master data. |
| Carrier (optional) | The carrier who delivered the batch. Can be used for billing. |
| Cheese | The type of cheese that is being stored. Is set automatically when the supplier is selected from their master data. |
| Number of Cheeses | How many cheeses are being stored. Is set automatically when selecting the cheese from its master data. |
| Cheeses Per Position | How many cheeses are in each storage position. Is set automatically when selecting the cheese from its master data. |
| Cheeses Per Pallet | How many cheeses are on a pallet during storage. Is set automatically when the cheese is selected from its master data. |
| Climate Zone | Where the batch is to be stored. The following selection options are available:
|
| Start Row | If a position has been selected for climate zone: Starting from which row free positions should be searched for. |
| Start Column | If a position has been selected for climate zone: Starting from which column free positions should be searched for. |
| Start Tier | If a position has been selected for climate zone: Starting from which tier free positions should be searched for. |
| Degree of Ripeness (optional) | how old the cheese is when stored |
| Storage Strategy | Which storage strategy is to be used. The following strategies are available:
|
| Print (optional) | How the storage receipt slip should be printed. Only works if automatic print during putaway is active.
|
| Crate number (optional) | The crate number of the batch |
| Storage Period (optional) | The expected storage period. In the tabular storage overview, you can filter according to this. |
| Cheese Manufacturer Number (optional) | The number of the manufacturer who produced the batch. |
| SSCC number (optional) | The SSCC number with which the batch was delivered |
| BBD (optional) | The best before date of the batch |
| Lot Number (optional) | The lot number of the batch |
| Storage Weight (optional) | The storage weight of the batch. If this is entered here, the weighing step is skipped on the putaway overview. |
| Treatment Plan (optional) | The sample treatment plan to be used for the batch. |
If one or more batches have been prepared, they can be transferred to the putaway view with Selected Batches for Putaway  The system then searches for the necessary free positions for these batches, according to the storage strategy. If enough positions are found, the pallets are created in the putaway view and the entry there is removed.
If not enough free positions are found, an error message appears.
Prepare Automated Batching (optional)
It is possible to automate the batch preparation. Examples of this are:
CSV Import
For CSV import there is another button next to New Entry.

By clicking the Import CSV button, a dialogue appears to select a CSV file. The software analyzes this file and creates a new batch. During this process, as many fields as possible are filled with data from the CSV file. If there is still data missing, it can be entered manually.
Database Import
During the database import, a database table is checked at regular intervals to see if there are any new entries. If new entries are found, a new batch is prepared from this data. As much data as possible will be filled in here as well. It is then once again possible to add any missing data manually.
Putaway
On the putaway view, a putaway weight can be assigned to the batches. The weight can be entered manually or automatically via a connected scale.
Normally the weight allocation is done by weighing the batch pallet by pallet.
The pallets created are displayed graphically and in a table. The left-hand side shows the pallets that have not yet been weighed, the right-hand side those that have already been assigned a certain weight.
In the center you will find the scale and the necessary buttons. If a scale is connected, its current net weight is also displayed.
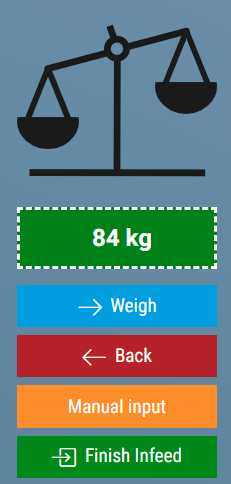
The following buttons are available:
- Weigh
- Scale is connected: The pallet on position one is assigned the current weight of the scale
- No scale connected: The same popup appears as for Manual Input
- Reverse: The last pallet on the right side is moved back to the left side. This allows the pallet to be assigned a weight once again.
- Manual Input: The Weigh Palett Popup opens. The pallet on position one is selected.
- Complete Putaway: The putaways of all pallets on the right are completed.
Weigh Pallet Popup
The pallet weighing popup opens through:
- Double-click on a pallet on the left. Then the pallet that was clicked on is preselected
- Click on Manual Input. Then the pallet on position one is selected.
- If no scale is connected, click on Weigh. Then the pallet on position one is selected.
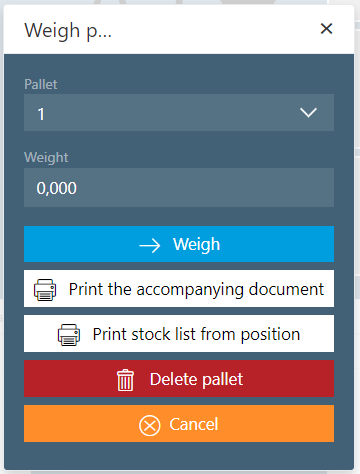
The Weigh Pallette popup allows you to manually assign a weight to a pallet. It is also possible to print various reports or delete the pallet.
- Pallet: This is where the pallet can be selected
- Weight: This is where the weight can be entered
- Weigh: Here the weight is assigned to the pallet and the pallet is placed on the right side
- Print receipt/issue slip (optional): Prints the storage receipt/issue slip for this pallet
- Print putaway list from position (optional): Prints the putaway list from this position on.
- Delete Pallet: Deletes the pallet and reduces the batch by that pallet.
- Cancel: Closes the popup
Reverse or Finish Popup
This window can be used to send a pallet back to the left or to complete the putaway for this pallet.
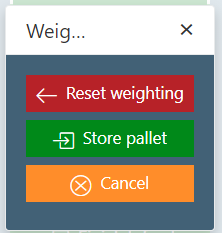
This window opens by double-clicking on a pallet on the right.
Tips
- Pallets can also be dragged from right to left.
- Right-click on the tables to sort the pallets.
Putaway by Robot (optional)
For putaway by robot the following procedure must be carried out:
- The pallets must be on the right side in the storage view. Putaway must not yet be completed and they must already have been assigned a weight.
- The robot must be set to Remote and Putaway
- Now you have to enter the pallet ID of the pallet you want to put into storage on the robot.
Caution
- If "Transfer" is selected on the robot, putaway cannot be carried out.
When all the boards on the pallet are reported by the robot as successfully placed in storage, the storage for this pallet is automatically completed. If an error occurs during the putaway process, not all boards are reported as successful and the putaway for this pallet must be completed manually.
When all order buffers for a pallet have been processed, the warning 'Invalid pallet ID' is displayed on the robot. Then the pallet ID must be changed to the next pallet.
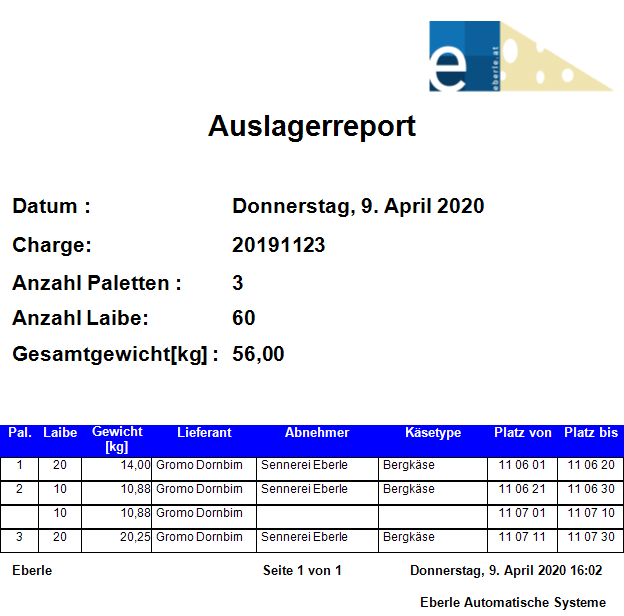
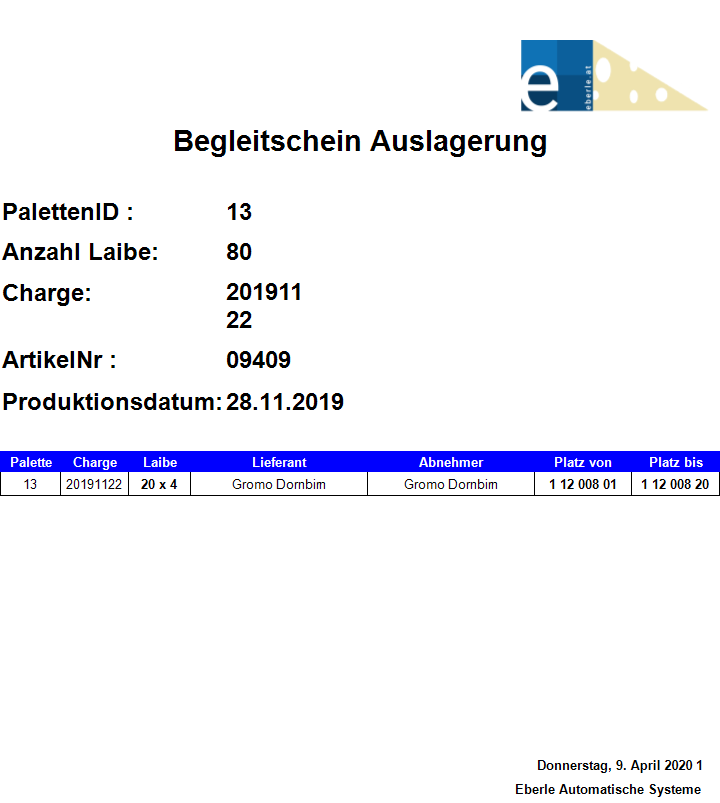
Storage Receipt/Issue Slip (optional)
Putaway List (optional)
Transfer
In the stock transfer view, all stock transfer pallets are displayed.

On the left, all transfer pallets are displayed. On the right, all cheeses of the pallets are displayed.

- Transfer Selected Pallets: Confirm all selected pallets as transferred. The Reserved source positions become available, the destination positions are occupied and reservations are removed.
- Remove Selected Pallets: Remove all selected pallets. The reservations are removed, but nothing is transferred.
- Print receipts: The stock transfer slip is printed for all selected pallets.
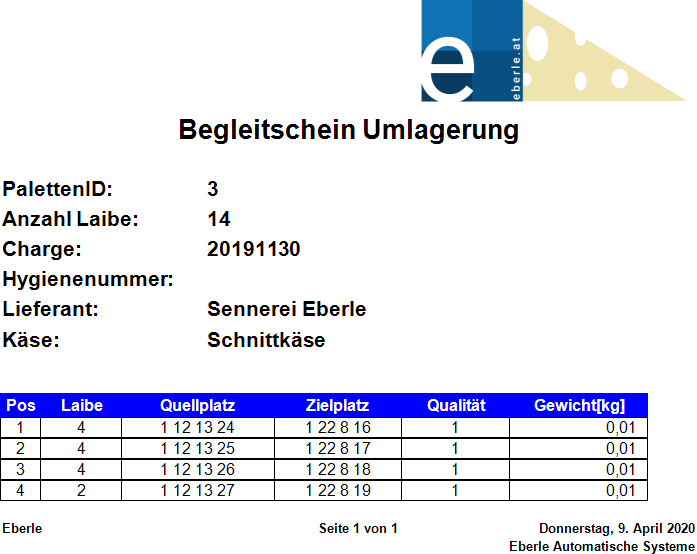
Stock Transfer Slip (optional)
Transfer by Robot
Transfer by robot works the same way as Retrieve by Robot and then Putaway by robot. The difference is that [Putaway by Robot] must be enabled on the robot. Instead of the storage pallet ID or retrieval pallet ID you enter the transfer pallet ID.
Retrieval
In the retrieval view, a retrieval weight can be assigned to the cheeses to be retrieved. The weight can be entered manually or automatically via a connected scale. The weight is assigned per pallet.
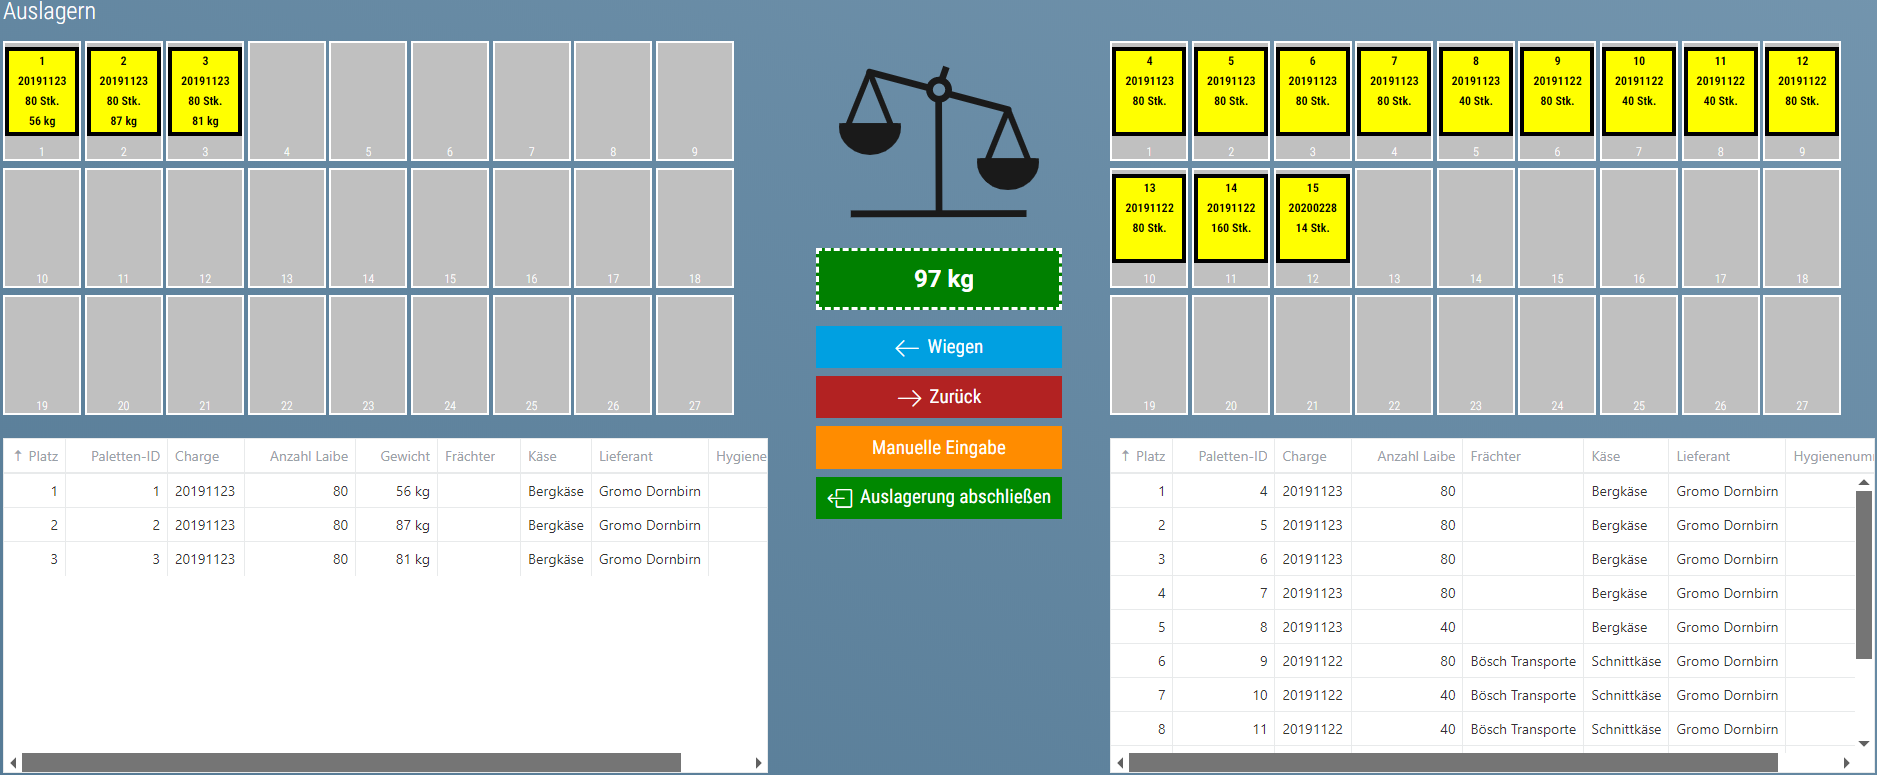
The pallets are displayed graphically and in a table. On the left there are those that have already been assigned a weight, on the right there are those that have not yet been weighed.
In the center you will find the scale and the necessary buttons. If a scale is connected, its current net weight is also displayed.
!Retrieval Buttons](images/Auslagern_Buttons.png)
The following buttons are available:
- Weigh
- Scale is connected: The pallet on position one is assigned the current weight of the scale
- No scale connected: The same popup appears as for Manual Input
- Reverse: The last pallet on the left side is moved back to the right side. This allows the pallet to be assigned a weight once again.
- Manual Input: The Weigh Pallet Popup opens. The pallet on position one is selected.
- Complete Retrieval: The Retrievals of all pallets on the left are completed.
Weigh Pallet Popup
The pallet weighing popup opens through:
- Double-click on a pallet on the left. Then the pallet that was clicked on is preselected
- Click on Manual Input. Then the pallet on position one is selected.
- If no scale is connected, click on Weigh. Then the pallet on position one is selected.
!Retrieval Weigh pallet Popup](images/Auslagern_palletWiegenPopup.png)
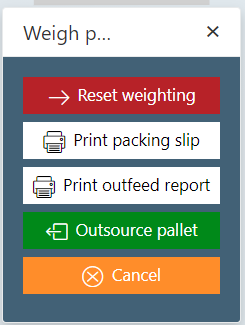
The Weigh Pallet popup allows you to manually assign a weight to a pallet. It is also possible to print various reports or delete the pallet.
- Pallet: This is where the pallet can be selected
- Weight: This is where the weight can be entered
- Weigh: Here the weight is assigned to the pallet and the pallet is placed on the right side
- Print Retrieval Slip (optional): Prints the retrieval slip for this pallet
- Print Retrieval List From Position (optional): Prints the retrieval list from this position on.
- Delete Pallet: Deletes the pallet and removes the reservation in the warehouse
- Cancel: Closes the popup
Return or Close popup
This window opens by double-clicking on a pallet on the left.
- Reset Weighing: Moves the pallet back to the right. Now a weight can again be assigned.
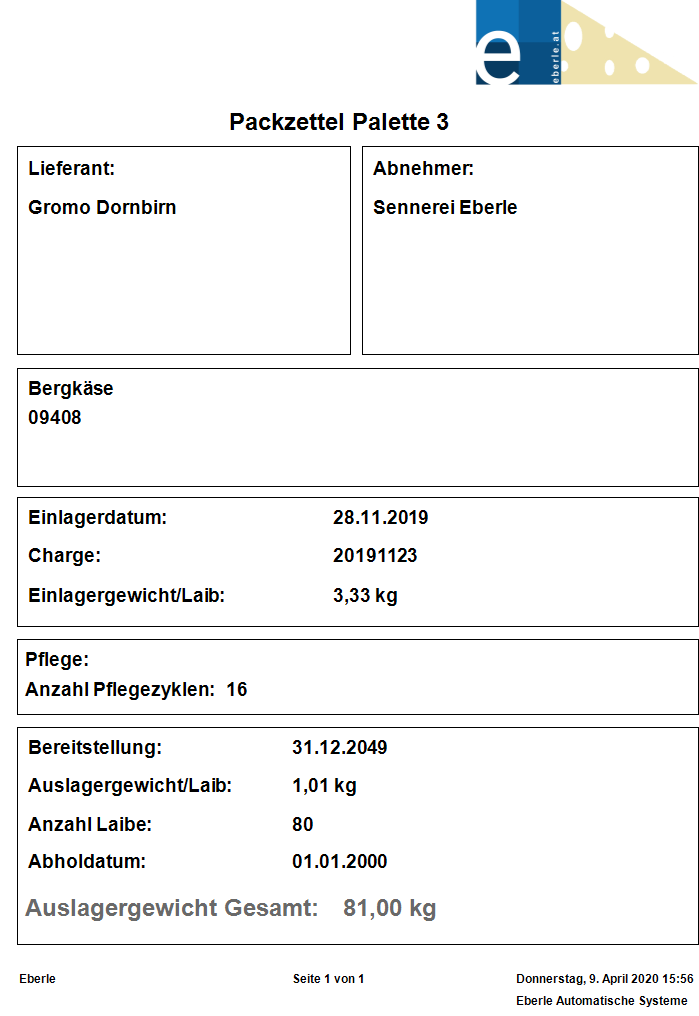
- Print Packing Slip (optional): Prints the packing slip for this pallet.
- Print Retrieval Report (optional): Prints the retrieval report for this pallet
- Retrieve Pallet: Confirms the cheeses on this pallet as retrieved from storage.
- Cancel: Closes the popup.
Tips
- Pallets can also be dragged from left to right.
- Right-click on the tables to sort the pallets.
Retrieval by Robot (optional)
For retrieval by robot the following procedure must be carried out:
- The pallets must be on the right side in the retrieval view. A weight must not have been assigned yet.
- The robot must be set to Remote and Retrieve
- Now you have to enter the pallet ID of the pallet you want to retrieve on the robot.
Caution
- If "Transfer" is selected on the robot, retrieval cannot be carried out.
As the weighing is still pending, the pallets cannot be removed automatically.
When all order buffers for a pallet have been processed, the warning 'Invalid Pallet ID' is displayed on the robot. Then the pallet ID must be changed to the next pallet.
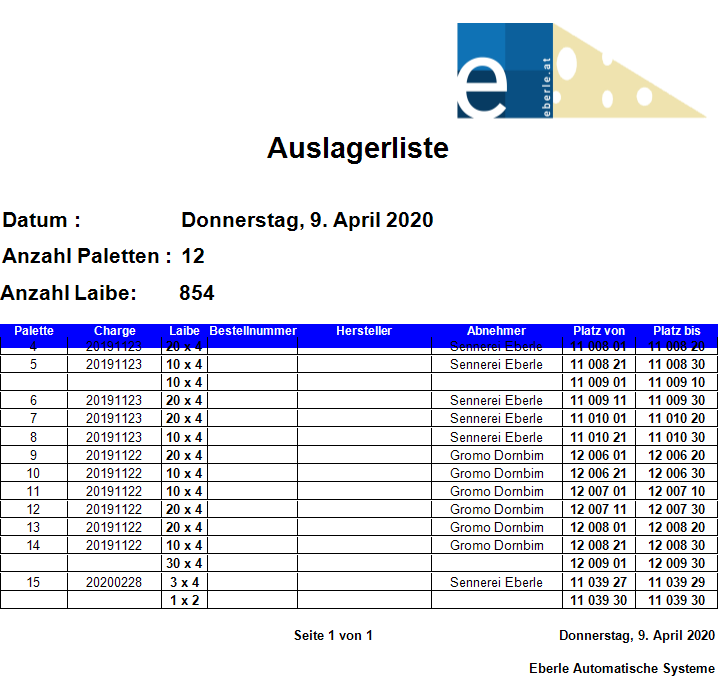
Retrieval List (optional)
Retrieval Slip (optional)
Packing Slip (optional)
Retrieval Report (optional)