ScriptComponent
With this simulation component a custom logic or behavior can be added to the simulation.

When to use
Use this simulation component if you want to add your own logic or behavior to the simulation. With scripts you can for example build a state-machine to control the behavior of a machine, which is especially useful if you want to make concept studies. Or you can add a custom logic which computes outputs depending on inputs.
How to use
Add this simulation component from the simulation component library. Then enter the number of inputs and outputs the script should have. If you need static variables, whose values are available between different executions of the script, you can add these variables. Select, when the script should be executed.
Now you are ready to start programming the script. Select the language you want to use and then click on the edit button near the property ScriptText.
The default editor is opened and you can start programming. The script is applied to the simulation after pressing save within the editor.
Tip
You can edit all properties of the script and even the script itself while the simulation is running. It is like programming a PLC online.
Parameters
AdditionalInputs
The number of inputs the script has. You can link these inputs to other simulation components and you can then use the values of the inputs within the script.
AdditionalOutputs
The number of outputs the script has. You can link these outputs to other simulation components and you can then change the values of the outputs within the script.
RunningType
Defines, when the script is executed. Possible values are:
| Value | Description |
|---|---|
| After Input Changed | The script is executed, when an arbitrary input changes it's value. |
| Before Simulation Step | The script is executed right before the simulation steps forward in time. |
| After Simulation Step | The script is executed right after the simulation has stepped forward in time. |
ScriptLanguage
Defines the programming language used to program the script.
ScriptText
The script itself, written in the defined programming language. Use the edit button to open the script in an external editor. The script is applied after you pressed save within the external editor.
Variables
Static variables, which are available across different executions of the script. To add a new variable, press the plus button near the property. To delete a variable expand the collection and press the delete button near the variable you want to delete. You can edit the properties of a variable by expanding the variable. Variables have the following properties:
| Property | Description |
|---|---|
| InitialValue | The value of the variable when the simulation starts after a reset. |
| Name | The name of the variable. This name can be used directly within the script. |
| Type | The data type of the variable. |
| Value | The current value of the variable. The value can be modified either by the script or by the user when the simulation is running. |
Inputs
Inputs are created dynamically according to the defined number of inputs.
Outputs
Outputs are created dynamically according to the defined number of outputs.
Example
The following example demonstrates, how to use a script as a simple controller. Imagine that we have a conveyor with a light-barrier on each side. When the left light-barrier is interrupted, the conveyor should move to the right and when the right light-barrier is interrupted, the conveyor should move to the left. To start and stop the conveyor, we have two additional buttons. The properties of the script are as follows:
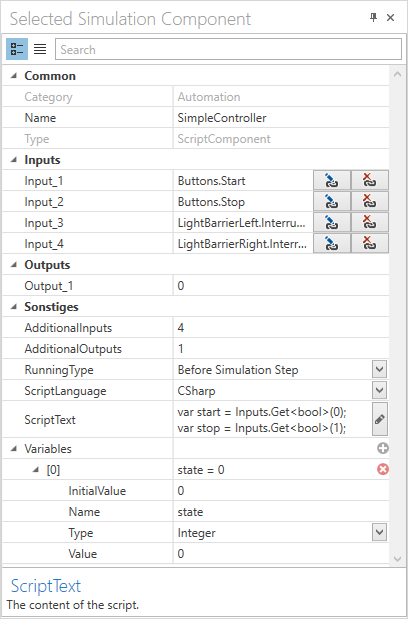
The script itself looks like this:
// Get the inputs
var start = Inputs.Get<bool>(0);
var stop = Inputs.Get<bool>(1);
var lightBarrierLeft = Inputs.Get<bool>(2);
var lightBarrierRight = Inputs.Get<bool>(3);

// State-machine
switch (state)
{
    case 0: // Idle state. Wait for the start button.
        SetConveyorSpeed(0);

        if (start && !stop)
        {
            state = 1;
        }

        break;

    case 1: // Conveyor is moving to the right
        SetConveyorSpeed(1);

        if (stop)
        {
            state = 0;
        }
        else if (lightBarrierRight)
        {
            state = 2;
        }

        break;

    case 2: // Conveyor is moving to the left
        SetConveyorSpeed(-1);

        if (stop)
        {
            state = 0;
        }
        else if (lightBarrierLeft)
        {
            state = 1;
        }

        break;
}

// Set the conveyor speed to the corresponding output
void SetConveyorSpeed(double speed)
{
    Outputs[0] = speed;
}
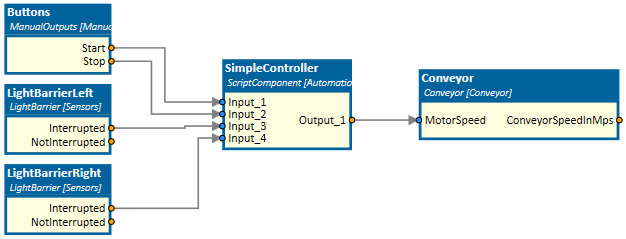
The buttons, light-barriers and the conveyor are connected according to the following image to the inputs and outputs of the script:
Further Information
For more details visit the Video Guides section, where you can find a video guide demonstrating this topic under Programming Scripts in C#.