• Home
  • User Manual
  • Tutorials
  • Updates
Search Results for

    Show / Hide Table of Contents
    • Welcome to twin
    • Getting Started
      • Install and uninstall twin
      • Install and uninstall a licence
      • Start twin
    • Simulation Component Library
      • Automation
        • ScriptComponent
        • Sequence
      • BitManipulator
        • BitsToBytesConverter
        • BytesToBitsConverter
        • EndiannessChanger
      • BooleanOperations
        • BooleanFunction
        • Invert
        • InputSwitch
      • ControlPanel
        • ControlPanel
      • Conveyor
        • Conveyor
        • VacuumConveyor
      • Debug
        • Counter
      • DataManipulator
        • DataReader
        • DataTypeConverter
        • DataWriter
      • FMU
        • FMU
      • Gripper
        • KinematicGripper
        • ObjectCoupler
        • VacuumGripper
      • HardwareConnector
        • PLCConnector
        • RobotControllerConnector
      • Math
        • Gain
        • LinearFunction
        • LowPassFilter
        • NumberComparer
        • Sum
      • Motor
        • FCControlledMotor
        • ServoMotor
      • Movers
        • BoolToSignedDirection
        • DynamicCylinder
        • DynamicRotationMover
        • DynamicTranslationMover
        • KinematicCylinder
        • KinematicPathMover
        • KinematicRotationMover
        • KinematicTranslationMover
      • ObjectManipulator
        • Colorizer
        • Object3DCutter
        • VisiblityChanger
      • Sensors
        • AngleLimitSwitch
        • CollisionObserver
        • DistanceSensor
        • DynamicObjectDetector
        • LightBarrier
        • PositionLimitSwitch
        • PositionTracker
      • Sinks
        • FileLogger
        • CollisionSink
        • RaySink
      • Sources
        • BoolConstant
        • BoxSource
        • DoubleConstant
        • Object3DFileSource
        • Object3DSource
        • RandomBoolean
        • RandomNumber
        • SinusGenerator
        • SphereSource
        • StringConstant
      • Timers
        • IntervalTrigger
        • TOF
        • TON
    • Collision Detection
      • What is essential for collision detection?
      • Where can I find the mesh simplifiers?
      • Which mesh simplification methods are available?
    • twin Mirror
      • Install the twin Mirror
      • Embed the twin Mirror into your HMI
      • React on user-events
      • Manipulate 3D objects
      • Add labels and buttons
    • Video Guides
      • How to install twin
      • How to organize projects
      • How to import CAD files
      • How to handle 3D objects
      • How to activate physics in your simulation
      • How to simulate conveyor systems
      • How to simulate cylinders
      • How to simulate axis systems and portals
      • How to simulate sensors
      • How to simulate grippers
      • How to create program sequences
      • How to connect to PLCs
      • How to simulate robots
      • How to model complex mechanical motion systems
      • How to debug and analyse signals in twin

    DistanceSensor

    This simulation component outputs a value indicating the distance to a 3D object within a configured range. This can be for example an optical distance sensor or an ultrasonic distance sensor.

    DistanceSensor

    When to use

    Use this simulation component if you want to output a value indicating the distance to a 3D object.

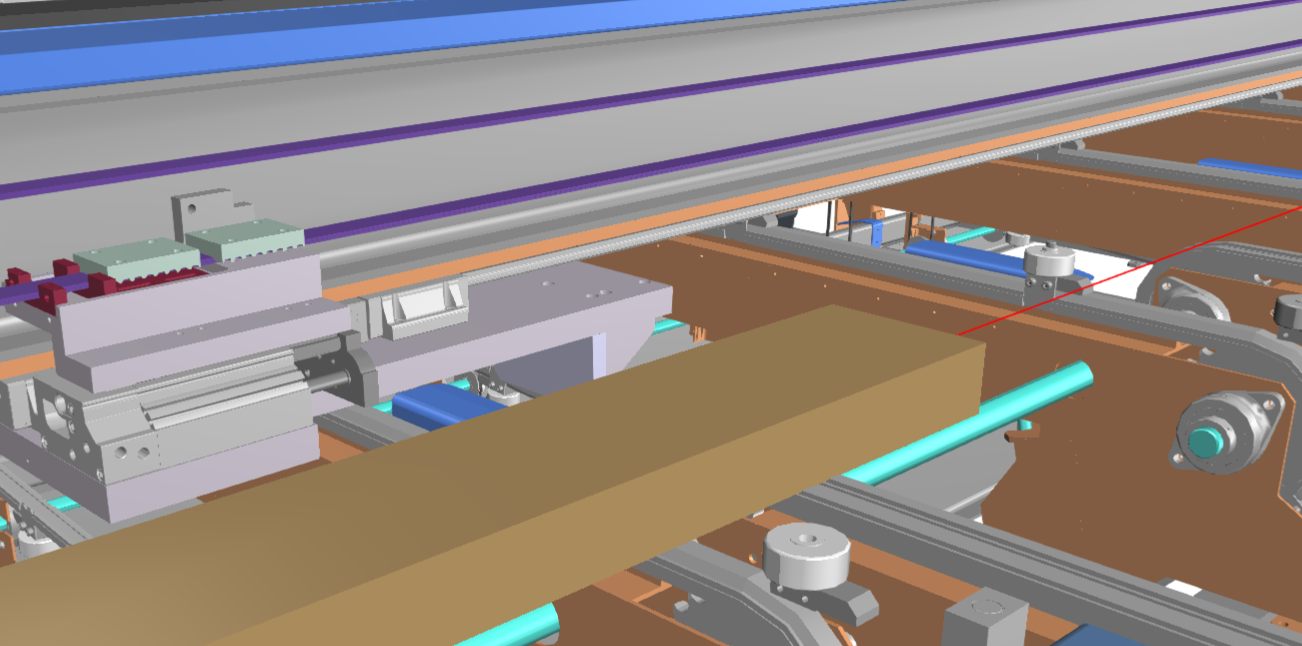
    For example, beams of different lengths run through a machine. The distance sensor is intended to measure the lengths in order to correctly pre-position a linear axis in order to be able to align the carriers on a stop.

    DistanceSensor measures Beam length

    How to use

    Add this simulation component from the simulation component library. If the sensor should be attached to a 3D object, select the 3D object either in the 3D View window or in the Assembly Structure window by using the select button near the property Object3D. After that you can adjust the origin of the light ray, change direction and define the valid window in which the measurement should be executed.

    Note

    The ray only detect 3D objects, which are part of the physical simulation. That means, only 3D objects whose Rigid Body Behavior is not equal to None can interrupt the light ray.

    Parameters

    GlobalDirection

    Indicates the direction of the light ray in the global coordinate system.

    GlobalOrigin

    Indicates the origin of the light ray in the global coordinate system.

    WindowStart

    A value indicating the start of the defined measurement window in m.

    WindowEnd

    A value indicating the end of the defined measurement window in m.

    DefaultDistanceOutput

    A value indicating the default distance output when no object is within the specified window.

    Possible values are:

    Value Description
    Window End The WindowEnd value is set as default distance output when no object is within the specified window.
    Window Start The WindowStart value is set as default distance output when no object is within the specified window.
    Zero Zero is set as default distance output when no object is within the specified window.

    Object3D

    Indicates the 3D object the light ray is attached to. If not set, the reference of the light ray is the world origin.

    Outputs

    Distance

    An output indicating the distance of the nearest object in m. If the object is outside the defined window, distance is the specified DefaultDistanceOutput.

    Interrupted

    An output indicating whether the light ray is interrupted by an other physical 3D object or not.

    NotInterrupted

    An output indicating whether the light ray is not interrupted by an other physical 3D object or is.

    Example

    In this example, the length of different beams should be measured as shown in the picture before. Therefore the sensor 3D object is selected as template and the windows are defined as shown in the picture below.

    DistanceSensor Example Properties

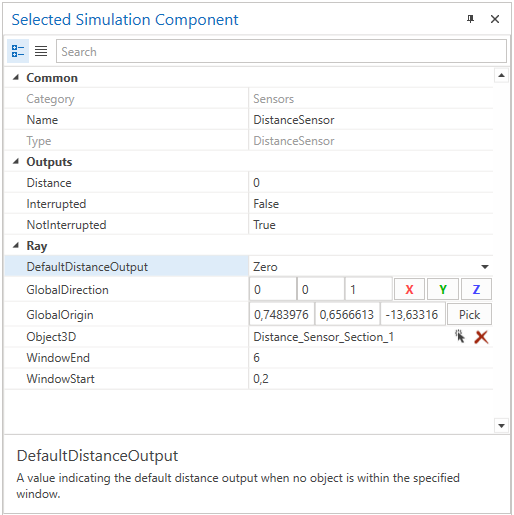
    If no beam is detected in the defined range of 0.2 to 6 m, the sensor outputs zero. The valid window is in the area of the red highlighted ray.

    DistanceSensor Defined Window

    Further Information

    For more details visit the Video Guides section, where you can find a video guide demonstrating this topic under Distance sensors.

    In This Article
    Back to top Copyright © Eberle Automatische Systeme GmbH & Co KG